日常学习速记[置顶]
常用网站
| Name | Link |
|---|---|
| *drive直链提取 | https://onedrive.gimhoy.com/ |
| 图片AI放大 | https://bigjpg.com/ |
| MSDN | https://msdn.itellyou.cn/ |
windows安装时手动分区
|
|
size的单位是MB
pip清华源
|
|
python2安装opencv出错
pip install opencv-python==4.2.0.32
参考连接
ssh算法弃用导致错误
ssh连接报错no matching key exchange method found. Their offer: diffie-hellman-group-exchange-sha1,diffie-hellman-group14-sha1,diffie-hellman-group1-sha1
解决方法:需要在/etc/ssh/ssh_config中添加KexAlgorithms +diffie-hellman-group1-sha1然后执行sudo ssh-keygen -A
VMware桥接网卡
在使用虚拟机的过程中,出现了桥接网络无法获取IP的情况,现记录解决方法
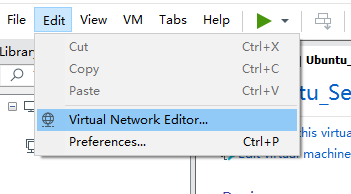
1.在菜单栏中选择Edit→Virtual Network Editor

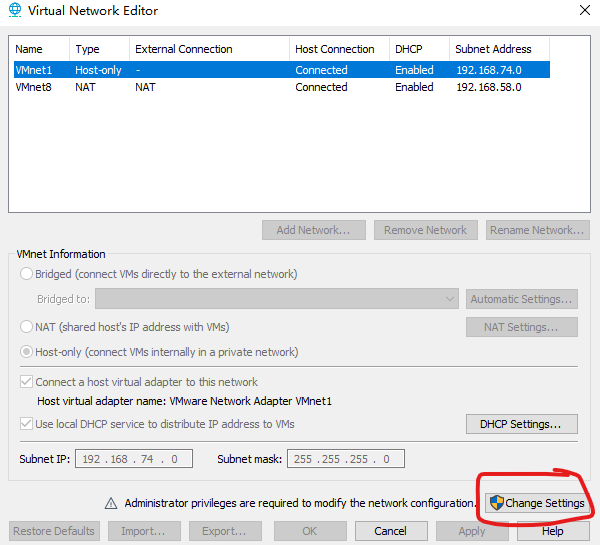
2.点击Change Settings,使用管理员权限修改

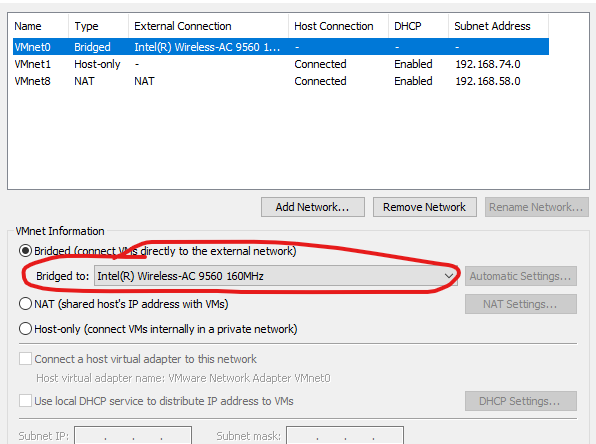
3.在桥接模式的设定中,选择桥接到本机的无线网卡

开启wsl2或hyperv后Jetbrains的IDE无法启动
PyCharm Pro 2021.3 suddenly cannot start IDE
WSL2, Hyper-V & Reserved Ports
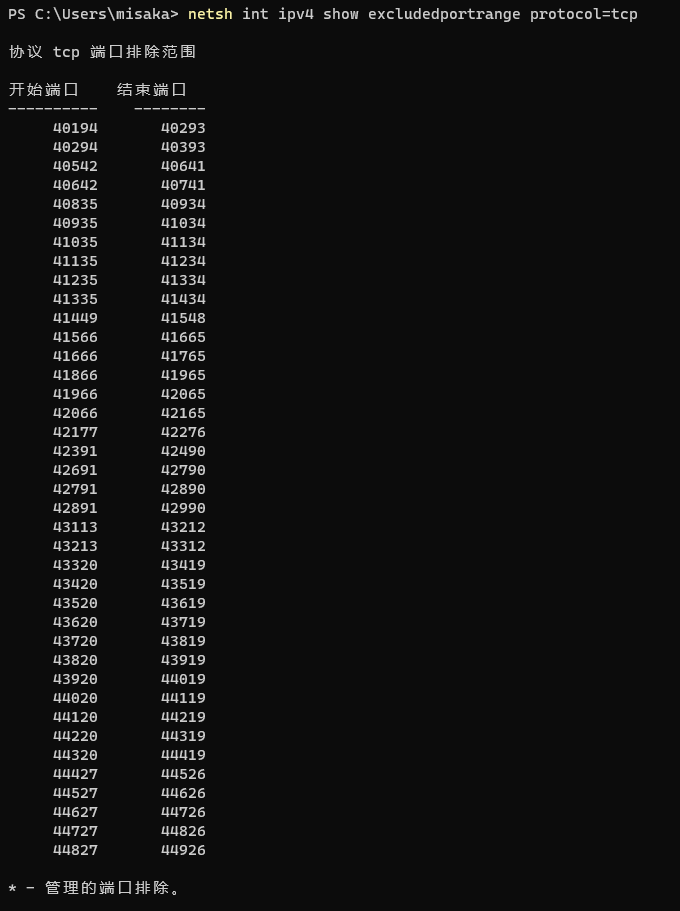
原因:IDE需要绑定的端口6942-6991被系统占用
netsh int ipv4 show excludedportrange protocol=tcp可以查看被系统占用的端口
netsh int ipv4 set dynamic tcp start=40000 num=5000将端口占用的范围修改到40000-45000
reg add HKLM\SYSTEM\CurrentControlSet\Services\hns\State /v EnableExcludedPortRange /d 0 /f禁止HNS占用

bash/zsh配置代理
在.bashrc或者.zshrc中添加如下内容
|
|
完成后,输入source .bashrc或者source .zshrc
oh-my-zsh配置
sh -c "$(curl -fsSL https://raw.githubusercontent.com/robbyrussell/oh-my-zsh/master/tools/install.sh)"
编辑~/.zshrc将ZSH_THEME的值改为ys或保持默认(个人喜好
隐藏用户名DEFAULT_USER=$USER
安装syntax-highlighting和zsh-autosuggestions
|
|
编辑~/.zshrc
plugins=(git z colored-man-pages zsh-autosuggestions zsh-syntax-highlighting extract)
在切换shell后,.bashrc中的代理设置要复制到.zshrc中
使zsh配置生效source ~/.zshrc
tar命令
https://www.cnblogs.com/jyaray/archive/2011/04/30/2033362.html
- 压缩
tar –cvf jpg.tar *.jpg 将目录里所有jpg文件打包成tar.jpg
tar –czf jpg.tar.gz *.jpg 将目录里所有jpg文件打包成jpg.tar后,并且将其用gzip压缩,生成一个gzip压缩过的包,命名为jpg.tar.gz
tar –cjf jpg.tar.bz2 *.jpg 将目录里所有jpg文件打包成jpg.tar后,并且将其用bzip2压缩,生成一个bzip2压缩过的包,命名为jpg.tar.bz2
tar –cZf jpg.tar.Z *.jpg 将目录里所有jpg文件打包成jpg.tar后,并且将其用compress压缩,生成一个umcompress压缩过的包,命名为jpg.tar.Z
- 解压
tar –xvf file.tar 解压 tar包
tar -xzvf file.tar.gz 解压tar.gz
tar -xjvf file.tar.bz2 解压tar.bz2
tar –xZvf file.tar.Z 解压tar.Z
- 排除目录
--exclude=xxx 排除xxx文件夹
tshark权限不足
|
|
解决方法sudo tshark -i wlan0 -w /tmp/out.pcap
hackthebox连接
https://app.hackthebox.com/home
注意事项
-
选择vpn连接方式时,选择
tcp/443 -
为了保证vpn连接的稳定,请在
.ovpn文件中添加指向宿主机的代理

- 使用openvpn时需要root权限,连接后先用ping检测能否连接题目